As an Amazon Associate, we earn from qualifying purchases. Some links on this site are affiliate links at no extra cost to you. Our recommendations are based on thorough research and editorial judgment.

Night & Low-Light Action Camera Filming: What to Expect + Best Practices
Night and low-light action camera filming involves unique challenges like low light exposure and motion blur. Set ISO between 800 and 3200 and maintain a shutter speed of at least 1/60 seconds to enhance brightness. Use wide-aperture lenses, like f/1.8, for better light sensitivity. Stabilize your camera with tripods or gimbals to avoid shake, and consider using external LED lights for clarity. Master these techniques to maximize success in low-light filming and discover additional insights ahead.
Key Takeaways
- Set ISO levels between 800 and 3200 for optimal brightness while minimizing noise in low-light conditions.
- Use a shutter speed of at least 1/60 of a second to capture fast action without motion blur.
- Employ wide-angle and fast lenses (f/1.8 or f/2.8) to enhance light sensitivity and improve image quality.
- Stabilize your shots with tripods or gimbals to prevent jitters and ensure smooth footage during filming.
- Edit footage post-filming by adjusting contrast, sharpness, and applying noise reduction techniques to enhance visibility.
Overcoming Common Challenges in Night Filming
You may be interested


Filming at night can be a real adventure, but it definitely comes with its own set of challenges. When you’re dealing with low-light conditions, one of the biggest issues is getting your footage properly exposed. A good rule of thumb is to adjust your ISO settings—just be careful not to crank them too high, or you’ll end up with grainy footage that just doesn’t look great.
To keep your shots sharp, consider leveraging available light sources, like LED lights. These can make a huge difference in visibility and overall image quality. For instance, if you’re shooting outside at night, you might bring along a portable LED panel to illuminate your scene without overwhelming it.
Another common hurdle is motion blur. If your subjects are moving, try shortening your shutter speed. Just make sure to keep an eye on the exposure—it can get tricky, and you don’t want your footage to look too dark. Using stabilization tools like tripods or gimbals is vital here; they help keep your shots steady and crisp.
Lastly, don’t overlook your camera’s noise reduction settings. Finding the right balance between capturing detail and improving quality in dark environments can really elevate your footage. It’s also wise to keep sterility assurance in mind when handling your equipment in varied environments to avoid contamination and maintain optimal performance. With these tips in your back pocket, you’ll be well on your way to capturing stunning nighttime scenes. Now, let’s talk about how to plan your shots for the best possible results!
Essential Settings for Action Cameras in Low Light

If you’re looking to capture stunning footage with your action camera in low light, understanding the essential settings can make all the difference. Start by adjusting the ISO to somewhere between 800 and 3200; this helps balance the brightness while keeping digital noise at bay. Think of it this way: a higher ISO means your camera can pick up more detail in dim conditions, which is super helpful when you’re filming during an evening skate session.
Next up, let’s talk about shutter speed. Aim for at least 1/60 of a second or faster to freeze any quick movements, especially if you’re recording something dynamic, like mountain biking after sunset. If your camera has a low-light video mode, consider turning that on; it automatically tweaks the settings for better exposure in darker environments. For extra brightness, using an external LED light can really lift your footage and help you avoid grainy shots.
Another handy tip is to adjust your camera’s field of view. Setting it to a wider angle allows the sensor to capture more light, which can definitely enhance your image quality when you’re shooting in the dark. So, whether you’re filming a nighttime hike or catching some action on the skatepark, these settings can help you make the most out of low-light conditions. Next, let’s explore some creative ways to enhance your shots even further!
Using an action camera light with at least 800 lux brightness output can significantly improve your footage quality in low-light environments.
Best Practices for Choosing Lenses and Setting Aperture

When you’re out there capturing night scenes with your action camera, picking the right lens and setting the aperture can really make a difference in your footage quality. I recommend going for a fast lens, like one with an aperture of f/1.8 or f/2.8. This means it can take in more light, which is crucial for nighttime shooting. With more light, you can use faster shutter speeds, which helps freeze those quick movements—perfect for action shots!
It’s also smart to choose a wide-angle lens. This lets you fit more of the scene into your frame, giving your shots a more dynamic feel. Think about those sweeping views of a city skyline or an exciting action scene on a dark street. Just a heads-up: steer clear of teleconverters, because they can cut down on light and mess with your image quality.
When it comes to setting your aperture, try to keep it as wide as you can. This will create a nice shallow depth of field, making your main subject really stand out against a blurry background. Don’t hesitate to experiment! Play around with different settings as you shoot in various lighting situations—you might find that balancing exposure with sharpness can lead to some stunning results. This way, you’re not just capturing a moment; you’re telling a story through your lens!
For enhanced results during night filming, consider cameras with advanced CMOS sensors designed for better low-light performance and color accuracy.
Maximizing Natural Light Sources for Night Filming

When it comes to capturing high-quality night footage, maximizing natural light sources is key. One simple trick is to position your subjects to face street lamps or even the moon. This helps enhance visibility in those low-light situations. For example, if you’re shooting a scene on the street, have your actor stand near a lamppost to really brighten them up.
Don’t forget about reflective surfaces too! Wet pavement or even a snowy ground can act like mirrors, bouncing that light back onto your subjects and making your shot pop. Now, take advantage of ambient lights, like neon signs. These can add some fun color contrasts to your shots, drawing attention right where you want it.
Timing can make a huge difference as well! Shooting during the blue hour—right after sunset or just before dawn—gives you that soft, diffused light in the sky which can really enhance the depth of your footage. And when you’re indoors, think about using lamps or screens as your light sources. Arrange your subjects so they can benefit from the warm glow, adding emotional depth to your scenes.
There’s so much potential in harnessing these natural light sources for night filming, and each technique can really elevate your final product. Now, let’s explore some tips on gear that works well in low-light conditions! Choosing a monitor with a brightness level of at least 450 nits can significantly improve visibility while filming in dim environments.
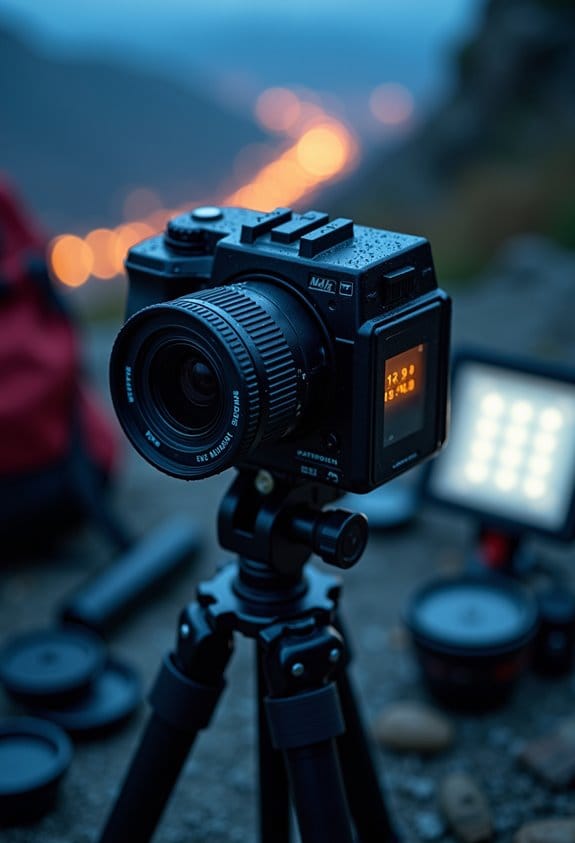
How to Stabilize Your Action Camera for Night Shots

Hey there! So, if you’re planning to shoot some stunning night footage with your action camera, stabilizing it is super important. A shaky camera can ruin those beautiful night shots, right? To keep everything steady, I recommend using a sturdy tripod. It keeps your camera still during those longer exposures, which is key for capturing all the lovely details in the dark.
If you want to move around, though, try using a gimbal or a handheld stabilizer. They’re great for smoothing out those bumps, especially when you’re navigating low-light conditions. For instance, if you’re filming while walking through a quiet park at night, a gimbal will really help keep your footage crisp and clear. Also, don’t forget to turn on your camera’s electronic image stabilization (EIS) if it has that feature; it helps reduce any jitters and makes a noticeable difference in quality.
You might also want to attach your camera to something stable when you can, like the side of a wall or even your car. This little hack can work wonders for avoiding motion blur. And if you’re on the go, consider wearing a chest or helmet mount; it’ll give you solid shots while keeping your hands free. So, next time you’re out to capture the night, these tips will help you get those gorgeous, clear shots! Additionally, using a gimbal with advanced 3-axis stabilization ensures you get professional-grade smoothness even in challenging low-light conditions.
How to Focus Better in Low Light?
Struggling to achieve sharp focus in low-light conditions? You’re not alone! When the lights go down, it can be tricky to get that perfect shot. One of the best ways to tackle this is to switch to manual focus. Autofocus can really struggle in dim settings, often resulting in what’s known as focus drifting. By manually adjusting the focus, you take control of the situation, which ultimately leads to sharper images.
Another handy tip is to use a flashlight or an external light source to quickly brighten your subject. Just a brief flash can make a big difference when you’re focusing. Once you have your subject lit up, you can lock in the focus and then take your shot. If your camera has a focus peaking feature, definitely take advantage of it! This tool highlights the areas that are in focus, which is super helpful when you’re wrestling with low light.
And don’t forget about your camera’s ISO settings. Increasing the ISO boosts your sensor’s sensitivity, allowing you to gather more light and achieve a better focus overall. It can be helpful to target subjects that have higher contrast or clear edges, like a street sign against a dark backdrop. These tips can guide you through capturing those elusive shots when the sun goes down, turning a challenging situation into an opportunity for creativity!
Additionally, maintaining a clean lens with a camera lens cleaning kit can significantly improve the clarity and sharpness of your night and low-light shots.
Edit Low-Light Footage for Maximum Impact
Editing low-light footage can really elevate those tricky shots and turn them into captivating stories. If you’re working with dark or dimly lit scenes, programs like Adobe Lightroom and Premiere Pro can be your best friends. First off, don’t forget to tweak the colors, sharpness, and contrast to bring your visuals to life—this will help fix exposure issues that typically come with low-light shots.
Once you have the basics down, it’s super helpful to apply some noise reduction. This step will lower the grainy texture that often pops up in low light, ensuring that what you see is crystal clear. For example, if your footage looks fuzzy, using noise reduction can help you maintain that important detail without completely losing that nighttime vibe.
After that, play around with color grading. Adjusting the overall tones can make your footage look much more inviting. It’s similar to finding just the right filter for an Instagram post; you want the colors to pop in a way that’s pleasing to the eye. Then, focus on shadows and highlights separately. This can really improve the dynamic range of your footage. So, if you have a dark scene with a bright light source, you can recover details that might otherwise get lost in the shadows or bright spots.
Lastly, don’t underestimate cropping and framing. By emphasizing the most important action in your scenes, you can help convey the story better. This little finesse can take your narrative from good to great. So, whether it’s an outdoor concert or a cozy indoor gathering, those details can make all the difference! Considering cameras with a CMOS sensor can also enhance low-light performance by capturing clearer and brighter images in dim conditions.
Troubleshooting Frequent Issues in Night Filming
Hey! Filming at night can be a lot of fun, but it does come with some challenges that can throw a wrench in your plans if you’re not prepared. One of the first things to consider is your ISO settings. Ideally, you’ll want to set it between 800 and 1600. This range helps keep your footage bright enough without introducing too much noise that can make everything look grainy.
Another big issue you might run into is motion blur, especially if you’re filming action. If you’re capturing fast-moving subjects, try to stick with a shutter speed of at least 1/60 of a second or faster. This will help freeze the action and keep your shots nice and clear. Also, don’t underestimate the power of stabilization. Using a tripod or a gimbal can make a world of difference in keeping your footage steady, which is crucial when shooting in low light.
And here’s a tip: bring along some external LED lights. They can really help illuminate darker areas and improve your overall visibility without overexposing your shots. Just remember, if you skip these adjustments, you might find that your footage ends up looking underexposed and messy. By taking these simple steps, you’ll be on your way to capturing some crisp, professional-looking night shots. Now, let’s talk about how to plan your shoot for the best possible results!
To make managing your filming devices easier, consider using a universal remote control for convenient operation without interrupting your setup.
Conclusion: Enhancing Your Night and Low-Light Action Camera Filming
Capturing great night and low-light action shots can be a thrilling challenge, but with the right gear and settings, you can achieve some amazing results. For instance, take the DJI Osmo Action 4. Its larger sensor is a big plus—it helps you capture more detail when the lights are low. When you’re filming in darkness, try setting your ISO between 800 and 1600. This will brighten your footage, but keep an eye out for noise—it can sneak in the shadows.
Using external LED lights can really make a difference too! If you’re out at night and want to illuminate your scene, those lights can help you get clear, vibrant shots. And don’t forget to play around with your shutter speed! For fast-moving subjects, a minimum of 1/60 second keeps everything sharp while still letting some light in. Lastly, if you’re using something like the Osmo Pocket 3, take advantage of its awesome stabilization features to keep your footage smooth, even if you’re moving around a lot.
Choosing a camera with advanced Electronic Image Stabilization technology can significantly enhance your night and low-light footage quality.
Incorporating these tips will elevate your night filming game, making all your adventures look fantastic. Now that you’ve set the stage for those stunning low-light shots, let’s talk about how to take your overall action camera skills up a notch!
Frequently Asked Questions
What Camera Settings Are Best for Low Light Action Shots?
For low light action shots, ideal settings include ISO around 800-1600, a fast shutter speed of 1/120 seconds, wide aperture, appropriate white balance, and effective lighting techniques to enhance frame visibility and capture dynamic movement.
What Is the 500 Rule for Night Photography?
The 500 Rule assists in night photography by determining maximum exposure time to prevent star trails. Calculated by dividing 500 by the lens focal length, it is essential for long exposure and astro photography.
What Is the 20 60 20 Rule in Photography?
The 20 60 20 rule in photography suggests using the exposure triangle effectively: allocate 20% to strong subjects, 60% for night scenes with careful composition techniques, and 20% for creativity through varied lens aperture and ISO settings.
Why Are Gopros so Bad in Low Light?
GoPro performance falters in low light due to sensor limitations, which exacerbate low light challenges. High ISO settings increase noise, while noise reduction further softens details, prompting a consideration of action cam alternatives for better results.


